INSANE
AI-powered stem separation and music generation, right inside your DAW.
powered by SOUNDBERRY.ai
View Guide
Overview
INSANE is an AI-powered VST/AU plugin that lives inside your DAW. Load any audio, separate stems, generate new audio with AI, and convert everything to editable MIDI.
Step | Action | Tag |
|---|---|---|
1 | Connect API Key | |
2 | Load Audio | CTX |
3 | Separate | STEMS |
4 | Reference | REF |
5 | Generate Audio | GEN |
6 | Convert to MIDI | MIDI |
7 | Edit & Export |
Generate Audio GEN
Load a context audio + optional reference track → the AI generates a new audio track inspired by your inputs and prompt. This is the creative step.
Convert to MIDI MIDI
Take the generated audio (or any stem) and convert it to MIDI notes displayed in the Piano Roll. Edit, quantize, and export as .mid for your DAW.
1. Connect Your API Key
When you first open INSANE, you'll see the welcome screen. You need a SoundBerry API key to unlock all features. Here's how to get one.

If you already have an API Key
Click "Connect API Key", paste your key, and you're in.
If you need to get an API Key
Click "Get API Key" in INSANE or go directly to soundberry.ai. Follow these steps:
STEP 1 — Log in to SoundBerry
Go to soundberry.ai/login and log in with your email or Google account. If you don't have an account, click "Register now" to create one.
STEP 2 — Dashboard
After logging in, you'll see the SoundBerry dashboard with three main sections: Describe Your Sound, Use Your Sound, and Projects.

STEP 3 — Navigate to Activation Key
In the left sidebar, click the key icon (at the bottom of the sidebar) to open the Activation Key page.

STEP 4 — Create a new key
Click "+ Add" to create a new activation key. You can optionally give it a name to identify it (e.g., "My Studio Mac").
STEP 5 — Copy your key
Your activation key is now created. Click "Copy" to copy it to your clipboard.

Important: The full activation key is only shown once! Make sure to copy it before closing the dialog. If you lose it, you'll need to create a new one.
STEP 6 — Paste in INSANE
Go back to INSANE in your DAW, click "Connect API Key", paste the key you just copied, and you're connected.
Tip: Your API key is saved locally, so you only need to enter it once. You can manage it later from the user profile panel inside INSANE.
2. Main Interface

After connecting, you'll see the main workspace with the Context and Reference tabs.
Interface Overview
Unit Tabs (T1, +) — At the top left. Each unit is an independent workspace. Click + to add more units and work on multiple tracks.
CONTEXT / REFERENCE tabs — Switch between the two main panels. Context is where you load your source audio; Reference is for style guidance.
Drop Zone — "Drop audio here" area where you drag & drop audio files or load them from the file browser.
Prompt Field — "Load/Drop or Prompt your context" — describe the style, mood, or genre you want.
Generate Button — Start the AI generation process.
Right Sidebar — Quick access icons for file browser, settings, and user profile.
3. Load Audio in Context
The Context tab is your main workspace. Load the audio track you want to analyze and generate MIDI from.
Loading Audio
You have two ways to load audio into the Context:
Drag & Drop — Drag any audio file (WAV, MP3, AIFF, FLAC) directly onto the "Drop audio here" zone.
File Browser — Click the folder icon to browse your filesystem and select a file.
After Loading

Once audio is loaded, INSANE automatically analyzes it and displays:
Waveform — Visual representation of your audio with playhead and loop region.
BPM — Detected tempo (e.g., 60, 120). You can modify this manually.
Key — Detected musical key (e.g., C, D, F#).
Scale — Detected scale type (Major, Minor, etc.).
Grid — Time grid subdivision (4/4, 3/4, 6/8, etc.).
Stems Dropdown — Select how many stems to separate (4 STEMS by default: Drums, Bass, Vocals, Other).
X button — Remove the loaded audio.
Note: All detected parameters (BPM, Key, Scale, Grid) are editable. If the auto-detection isn't accurate, you can click on any value to change it manually.
4. Reference Tab

Use the Reference tab to provide a style reference that guides the AI generation.
Adding a Reference
The Reference tab works similarly to the Context tab:
Drop or browse a reference audio file — this should be a track whose style, mood, or structure you want to emulate.
After loading, the waveform and detected parameters are shown.
Use the prompt field ("describe the reference mood and style...") to add textual guidance.
Tip: The reference is optional but highly recommended. It helps the AI understand the musical style you're aiming for, producing more relevant MIDI output.
5. Stem Separation
INSANE uses AI to separate your audio into individual stems (Drums, Bass, Vocals, Other).
How to Separate Stems
After loading audio in the Context tab, click the "4 STEMS" dropdown to choose the number of stems, then the separation starts automatically. You can also trigger it from the stems panel.

Stems Panel Controls
Stem Labels — DRUMS, BASS, VOCALS, OTHER — each with its own waveform display.
Solo/Mute (colored dots) — Click the colored dot next to each stem to solo it. When soloed, the dot turns green and only that stem plays. Muted stems appear grey.
Piano Roll button — The piano icon on the right of each stem opens the Piano Roll for that specific stem's MIDI data.
X button — Remove an individual stem.
Drag handles — Reorder stems by dragging the grip dots on the left.
Note: Stem separation uses your SoundBerry credits. The number of stems (2 or 4) affects credit usage.
6. Generate Audio
The AI takes your context audio + optional reference and generates a brand new audio track.
How to Generate with context and reference
Load audio in the CONTEXT tab — this is the source the AI will analyze.
Optionally, load a reference track in the REFERENCE tab to guide the style.
Write a prompt to describe what you want (mood, genre, instruments — optional but recommended).
Click the Generate button.
Wait for the AI to process — you'll see a loading spinner.

After Generation
Once generation is complete:
A new GEN button appears in the transport bar — click it to listen to the generated audio.
The generated audio waveform is displayed in the main view.
You can play it back, compare it with the original context, or regenerate with a different prompt.
The generated audio is automatically saved to the SoundBerry/Generated folder.
Tip: Not happy with the result? Change the prompt, adjust the reference, or simply hit Generate again. Each generation creates a new output without overwriting the previous one.
7. Convert to MIDI
Transform the generated audio (or any stem) into editable MIDI notes.
How to Convert
After generating audio or separating stems, you can convert any audio track to MIDI:
Click the piano roll icon next to any stem, or use the conversion button on the generated audio.
INSANE analyzes the audio and extracts MIDI notes (pitch, timing, duration).
The MIDI button appears in the transport bar.
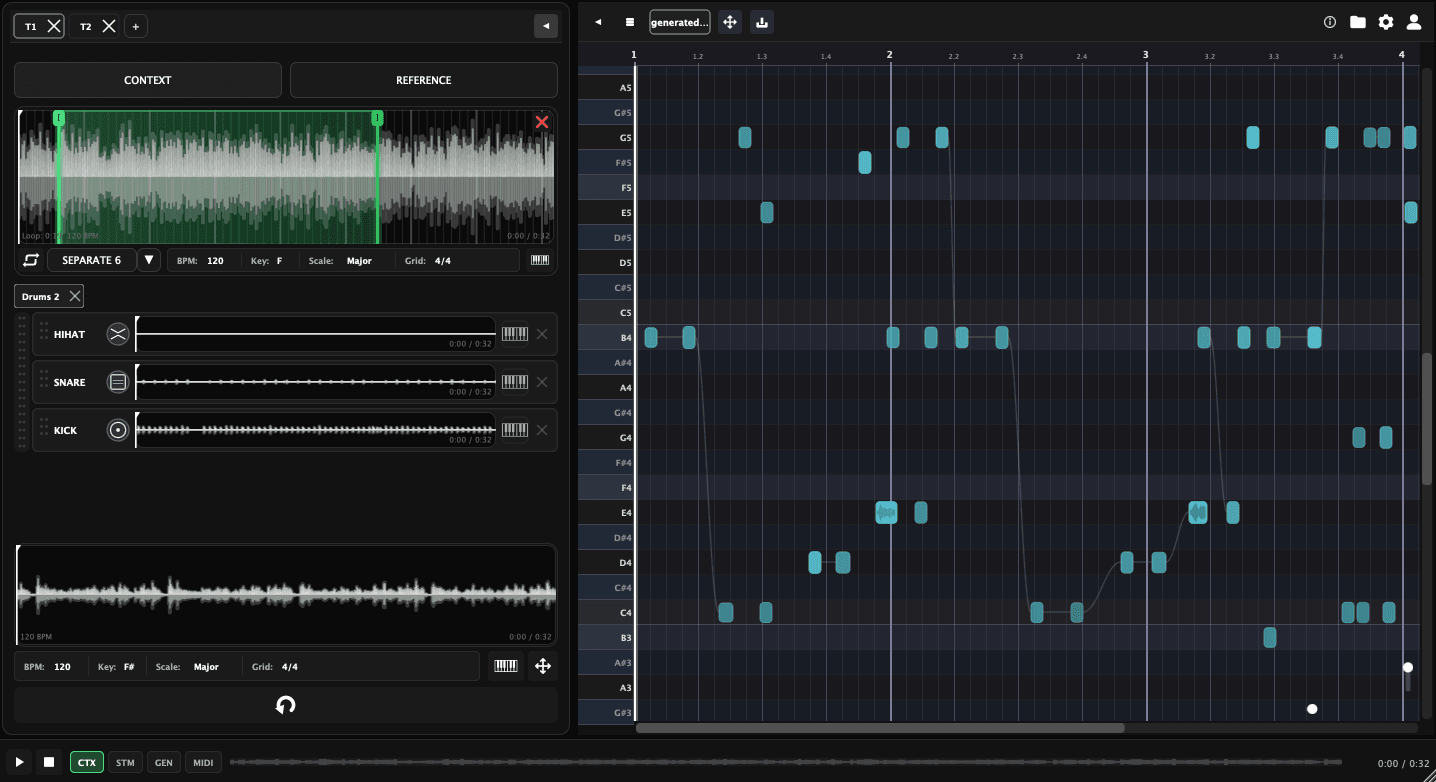
The Piano Roll opens with the extracted MIDI notes ready to edit.
Generate Audio vs Convert to MIDI: These are two separate steps. Generate creates new audio from your context + reference. Convert to MIDI takes any audio (generated, stems, or original) and extracts the notes as editable MIDI data.

8. Piano Roll
View, edit, and export the generated MIDI notes in a full-featured piano roll editor.
Piano Roll Overview
The Piano Roll shows MIDI notes on a grid where:
Y-axis (vertical) — Pitch, from low (bottom) to high (top), labeled with note names (C3, D3, E4, etc.).
X-axis (horizontal) — Time, divided into bars and beats (1, 1.2, 1.3, 2, 2.2, etc.).
White rectangles — MIDI notes. Their horizontal length represents duration, vertical position represents pitch.

Toolbar Controls (left to right)
← Collapse arrow — Collapses the Piano Roll and returns to the main view.
☰ Menu button — Opens a dropdown showing all your tabs/units. Click a tab name to switch to it, click X to delete, or use "+ New Tab" to create a new one.
▶ Name label ("generated...") — Shows the name of the current track. Double-click to rename it. During processing, it shows animated states: "MIDI..." while converting, "..." while rendering audio.
MIDI Drag & Drop DRAG TO DAW
The crosshair/move icon next to the name label is the MIDI drag & drop button. This is the fastest way to get your MIDI into your DAW:
Click and hold the drag icon.
Drag it directly into your DAW (Logic Pro, Ableton, FL Studio, etc.) — onto a MIDI track or arrangement view.
The MIDI file is automatically exported and dropped into your DAW as a .mid file.
The MIDI file is also saved automatically to the SoundBerry/MIDI/ folder on your system.

Audio Drag & Drop DRAG TO DAW
Right next to the MIDI drag button, there's the audio export icon. It works the same way:
Click and hold the audio export icon.
Drag it directly into your DAW to drop the rendered audio file onto a track.
Both buttons sit side by side — one for MIDI, one for audio — so you can quickly drag whichever format you need into your DAW.
Right-side buttons
Folder icon — Left-click to open the SoundBerry output folder. Right-click to change the output folder location.
Settings icon — Toggle the Time & Pitch settings panel (BPM, grid, snap, key, scale).
User icon — Open your account panel (credits, API key, feedback).
Editing Notes
Select — Click on a note to select it. Hold
Shiftto select multiple.Move — Drag selected notes to reposition them (pitch and time).
Resize — Drag the right edge of a note to change its duration.
Delete — Select notes and press
DeleteorBackspace.Add — Double-click on an empty area to create a new note.
Undo/Redo —
Cmd + Z/Cmd + Shift + Z
9. Transport Bar
The transport bar at the bottom of the interface controls playback and view switching.
Transport Controls
Element | Description |
|---|---|
CTX | Switch to Context view — shows the original audio waveform. |
STM | Switch to Stems view — shows separated stems. |
GEN | Switch to Generated view — shows generated audio/MIDI (appears after generation). |
MIDI | Switch to MIDI/Piano Roll view (appears when MIDI data is available). |
Play / Stop | Standard playback controls. |
Progress bar | Shows current playback position. Click to seek. |
Time display | Current position / total duration (e.g., 0:10 / 0:32). |
Color dots | MIDI source selectors — click to toggle which MIDI sources are active during playback. |
10. Settings Panel
Configure time and pitch parameters for your project.

Time Settings
Use DAW Tempo / Beat — Toggle to sync with your DAW's tempo and time signature.
BPM — Set the tempo manually (e.g., 120).
Beat — Time signature (4/4, 3/4, 6/8, etc.).
Grid — Grid subdivision for snapping (1/4, 1/8, 1/16, etc.).
SNAP — Enable/disable grid snapping for note editing.
WARP — Enable audio time-stretching to match tempo.
Pitch Settings
Key — Musical key (C, C#, D, ... B).
Scale — Scale type (Major, Minor, Dorian, etc.).
SNAP TO SCALE — When enabled, edited notes will snap to the selected scale, preventing out-of-key notes.
11. Account & Credits

Manage your SoundBerry account, credits, and API key.
Account Panel
Click the user icon (top-right or in the sidebar) to open your account panel:
Name & Email — Your SoundBerry account info.
Credits — Your remaining credits with a Reload button to refresh the count.
Manage API Key — View, change, or disconnect your API key.
Buy Credits — Opens the SoundBerry website to purchase more credits.
Send Feedback — Report bugs or suggest features directly.
Credits: Stem separation and MIDI generation each consume credits. Check your balance before starting large batch operations.
12. File Management

INSANE organizes all output files in a dedicated SoundBerry folder on your system.
Folder Structure
Folder | Contents |
|---|---|
Generated | AI-generated audio files from the generation process. |
MIDI | Exported MIDI files (.mid) from the Piano Roll. |
Stems | Separated stem audio files (Drums, Bass, Vocals, Other). |
Tip: You can quickly open the SoundBerry folder by clicking the folder icon in the plugin toolbar. All files are saved automatically and organized by session.
INSANE — powered by SOUNDBERRY.ai
Need help? Contact support@soundberry.ai